Bio • Foam
I love this recipe because it is just so versatile! It can be used to cast large sheets of thick material for sewing and or to form fabric bio-composites. It can be poured over existing structures once viscous or used as cushioning. Personally I find this material to be a good substitute for packaging and furniture foam.
Ingredients
Equipment
- nonstick pot
- whisk or blender
Preparation
- Combine the water, gelatin, and glycerin in a nonstick pot.
- Heat over low until mixture just begins to simmer.
- Heat the beeswax in a microwave for 30 seconds or until liquid. Add beeswax to the mixture and stir until homogenous.
- Add in the dish soap and turn off the heat.
- Allow the mixture to cool to the point where it is no longer steaming and begin to whisk.
- Pour into mold.
SHRINKAGE RATE
The shrinkage rate for this recipe seems to be roughly 10%. The largest test made so far was 8.75″ in diameter when freshly poured and ended at 8″ when fully dried.
A Note on Beeswax
I've included beeswax in my recipe but it's important to note that is not necessary to the success of Biofoam. I have found that it helps it retain more height and adds a little water resistance that I found desirable. That said, it does make the Biofoam slightly less flexible. Play around with various amounts of beeswax until you find a blend that is right for your purposes.
When adding the beeswax, I've also found that it speeds up the process to first melt it in the microwave before adding it into the recipe. I put it in a silicone mixing cup and microwave it for 15 seconds before pouring the melted wax into the pot with the molten gelatin mixture.
Getting the Perfect Texture
After the material is mixed over heat, it needs to be whisked to incorporate air into the matrix which will give it its foam-like texture. If you've ever made marshmallows from scratch, this texture should be very familiar to you! I find the best time to begin whisking is as the mixture begins to cool; it will start to noticeably rise in the bowl as the air bubbles you whip into it are held in the sticky matrix. If you overmix it however you can knock the air bubbles right back out again. At this stage the Biofoam can be poured into a mold, or even poured over existing structures if you like. It should be quite viscous.

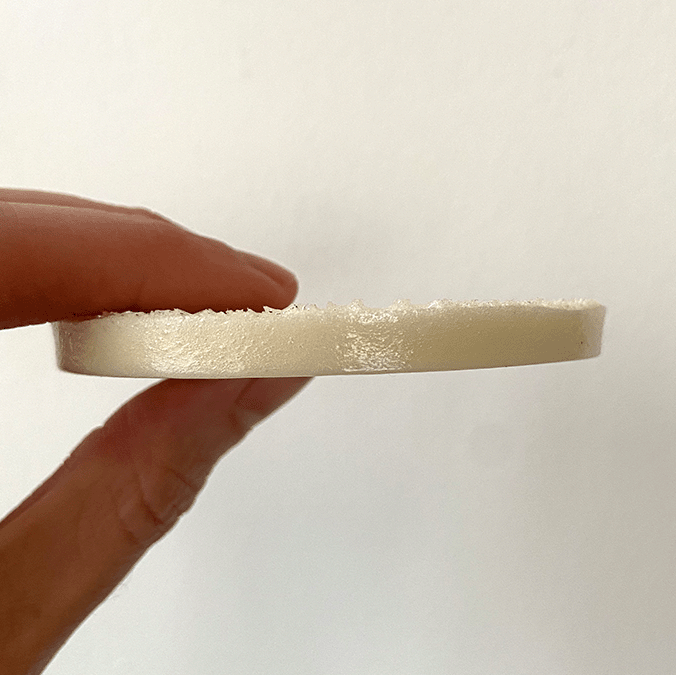
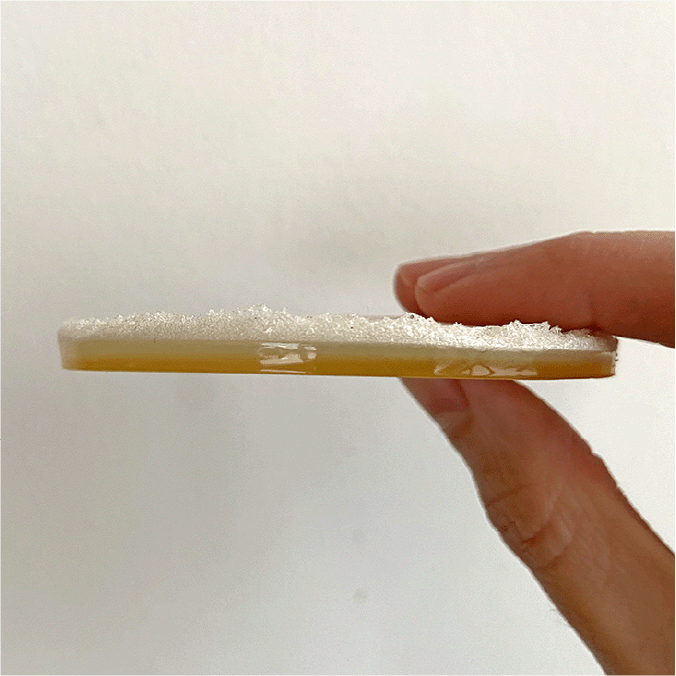
Below is a side by side comparison of how the timing of when you whisk your mixture can dramatically affect the final material. On the left is a result from when the material was whisked while cool enough to keep the air bubbles trapped in the matrix. The material wasn't actually cool since it would be too viscous to pour but was cool enough that I could stick a finger in it without discomfort. On the right is a result from when the material was whisked while still hot. As you can see, the bubbles rose to the surface to form a layer on top of the base gelatin bioplastic recipe. This isn't necessarily bad – it could be an interesting design choice if you want the material to have two different qualities on either side. It's just something to keep in mind as you approach this recipe.
I've played around with this recipe a fair bit and have learned a bit about how to process it as well. While it can be cut with a regular Olfa blade, depending on how thick you make your material you might want something more heavy duty. I made a version that was 1.5″ deep and wanted a clean edge that even a hot Olfa blade didn't create. In the end, I found a hot wire cutter worked perfectly and cut through the material like butter. Considering hot wire cutters are usually used for foams in the first place, I guess I shouldn't have been surprised.
Remelting Process
If your results aren't exactly what you'd hoped for, you can always remelt your Biofoam and start again! The process won't be as smooth as the first time and there is likely to be more gelatin clumps this time around, but it is a good way to save your material costs (especially for a large batch). I made a video of how I prefer to do this – I will usually add in a little bit of water to ensure the mixture gets liquid enough to pour and doesn't burn the gelatin in the process. It's important to do this slowly and over a low-medium heat.


